21-11-11 Collection#2, Exception
Collection
Iterator
반복자 : 컬렉션 내부의 데이터를 순회할 수 있는 객체이다.
Iterator<데이터타입> iter = 컬렉션이름.iterator(); 형식으로 선언하고 아래와 같이 사용할 수 있다.
Iterator<Integer> iter = lotto.iterator();
while(iter.hasNext()) System.out.printf("%d ", iter.next());
System.out.println();
위와같이 리스트를 모두 한 번 순회하고 나서 다시 처음부터 컬렉션 내부르르 순회하고 싶다면 iter = 컬렉션이름.iterator(); 를 통해 다시 제어권을 얻어야한다.
(향상된 for문을 통해서도 컬렉션 내부 데이터를 순회할 수 있다. ※단 제네릭사용 必)
Hashtable, HashMap 클래스
데이터베이스 내부의 키 값을 검색하기 위해 만들어진 알고리즘을 기반으로 작성된 클래스
Key, Value를 저장할 수 있는 클래스로 Key는 중복을 허용하지 않지만 Value는 중복을 허용한다.
HashMap이름.put(key값, Value값); 으로 데이터를 저장한다.
저장 예시
HashMap hm = new HashMap();
hm.put(1, "One");
hm.put(2, "Two");
hm.put(3, "Three");
예시와 같이 key값과 value값의 데이터 타입이 다를 경우 제네릭 문법을 아래와 같이 사용한다.
Hashtable<String, Integer> ht = new Hashtable<String, Integer>();
HashMap<Integer, String> hm = new HashMap<>();

HashMap<Integer,ArrayList<String>> kk = new HashMap<>();
HashMap<Integer,Object> pp = new HashMap<>();
(value 값으로 데이터 타입 뿐만아니라 배열도 넣을 수 있다)
Object타입을 사용하면 모든 데이터 타입을 한 HashMap/HashTable에 넣을 수 있다.
HashMap/HashTable 클래스는 get 메소드에 Key값을 전달하여 Value를 리턴 받는다.
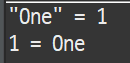
ht.put("One", 1);
ht.put("Two", 2);
ht.put("Three", 3);

hm.put(1, "One");
hm.put(2, "Two");
hm.put(3, "Three");

System.out.printf("\"One\" = %d\n", ht.get("One"));
System.out.printf("1 = %s\n", hm.get(1));
HashMap/HashTable 클래스 내부의 데이터를 반복문으로 접근하는 방법
1. Enumeration 타입 사용
Enumeration : 열거형 자료형식(인터페이스)
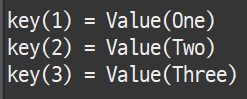
Enumeration<String> e1 = ht.keys();	//키들의 접근 권한을 저장
while (e1.hasMoreElements()) {//키값이 더이상 없을 때까지 반복

	String key = e1.nextElement(); //키값을 key변수에 넣고
	int value = ht.get(key);	//key값으로 검색한 value를 추출
	System.out.printf("key(%s) = Value(%d)\n", key, value);
}

2. for문을 활용하여 key값 순회
: hm.keySet() 을 통해 key값을 리스트로 만든 후 반복
for(Integer k : hm.keySet()) { // hm.keySet() : key값만 모아서 리스트로 생성
	String v = hm.get(k);
	System.out.printf("key(%d) = Value(%s)\n", k, v);
}
중복되지 않은 키 값, 중복된 밸류값, 중복된 키 값 추가하기
import java.util.*;
public class Collection06 {
public static void main(String[] args) {
Hashtable<String, Integer> ht = new Hashtable<>();
HashMap<Integer, String> hm = new HashMap<>();
ht.put("One", 1);
ht.put("Two", 2);
ht.put("Three", 3);
hm.put(1, "One");
hm.put(2, "Two");
hm.put(3, "Three");
System.out.printf("ht.size() -> %d\n", ht.size()); //ht.size() -> 3
System.out.printf("hm.size() -> %d\n", hm.size()); //hm.size() -> 3
//1. 중복되지 않은 키 값으로 데이터 추가
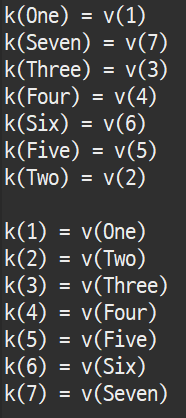
ht.put("Four", 4); ht.put("Five", 5);
hm.put(4, "Four"); hm.put(5, "Five");
System.out.printf("ht.size() -> %d\n", ht.size()); //ht.size() -> 5
System.out.printf("hm.size() -> %d\n", hm.size()); //hm.size() -> 5
//2. 키값 중복은 없고 밸류값은 중복되게 추가
ht.put("Six", 1); ht.put("Seven", 2);
hm.put(6, "One"); hm.put(7, "Two");
System.out.printf("ht.size() -> %d\n", ht.size()); //ht.size() -> 7
System.out.printf("hm.size() -> %d\n", hm.size()); //hm.size() -> 7
//3. 동일한 키값에 다른 value입력시 기존 value값이 수정된다.
ht.put("Six", 6); ht.put("Seven", 7);
hm.put(6, "Six"); hm.put(7, "Seven");
System.out.printf("ht.size() -> %d\n", ht.size()); //ht.size() -> 7
System.out.printf("hm.size() -> %d\n", hm.size()); //hm.size() -> 7
for(String k : ht.keySet()) System.out.printf("k(%s) = v(%d)\n", k, ht.get(k));
System.out.println();
for(Integer k : hm.keySet()) System.out.printf("k(%d) = v(%s)\n", k, hm.get(k));
}
}
2번에서 입력한 key값에 다른 value를 put한 3번의 출력 결과를보면 ht와 hm의 size()가 2번과 동일하다.
마지막 출력용 for문의 결과를 확인하면 2번에서 입력한 value값이 3번에서 입력한 value값으로 대체된 것을 알 수 있다.
컬렉션 클래스의 메소드
indexOf(값); : 값의 index위치를 반환한다. 존재하지 않는다면 -1반환
ArrayList<Integer> list = new ArrayList<>();
list.add(10); list.add(20); list.add(30);

int target_index = list.indexOf(20);
System.out.printf("20의 위치 : %d\n", target_index);	//1

//검색할 값이 존재하지 않는 경우 -1 반환
target_index = list.indexOf(50);
System.out.printf("50의 위치 : %d\n", target_index);	//-1
contains(값); : 값이 배열 내에 존재하는지를 boolean타입으로 반환한다.
System.out.printf("20의 존재 여부 : %b\n", list.contains(20));	//20의 존재 여부 : true
System.out.printf("50의 존재 여부 : %b\n", list.contains(50));	//50의 존재 여부 : false
컬렉션 클래스와 객체
사용자 정의 클래스에 equals 메소드가 오버라이딩 되지 않은 경우 컬렉션 내부에서 동일한 형태의 객체를 검색 및 비교할 수 없다.
import java.util.*;

class Point {
	private int x;
	private int y;
	public Point(int x, int y) {this.x = x; this.y=y; }
	public String toString() {return "x:" + x + ", y:" + y;}

	}
}
public class Collection08 {

	public static void main(String[] args) {

		ArrayList<Point> list = new ArrayList<Point>();
		Point p1 = new Point(10, 10);
		list.add(p1);
		list.add(new Point(20, 30));
		list.add(new Point(30, 30));

		for (Point p : list) System.out.println(p);

		int index = list.indexOf(new Point(30,30));
		System.out.printf("(30,30)의 위치 : %d\n", index);
		boolean con = list.contains(new Point(30,30));
		System.out.printf("(30,30)의 저장 유무 : %b\n", con);

	}

}

값이 같더라도 equals 메소드가 오버라이딩 되어 있지 않다면 배열 내에 존재 하지 않는다는 결과를 리턴한다.
public boolean equals(Object obj) {
if(!(obj instanceof Point)) return false;
Point target = (Point) obj;
boolean result = ((this.x==(target.x))&&(this.y==target.y));
return result;
}
Point 클래스 내에 equals 메소드를 위와 같이 오버라이딩 하고 다시 실행하면 정상적으로 동작한다.

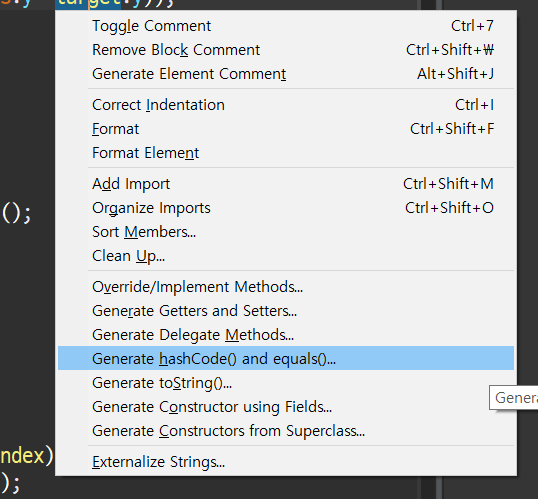
Alt+shift+s를 누르면 나오는 메뉴창을 보면 준필수적으로 오버라이딩 해주어야하는 메소드들을 자동으로 생성해주는 메뉴를 사용할 수 있다.
※ Hash 알고리즘을 기반으로 구현된 클래스에서는 equals 메소드가 호출되지 않는 문제점이 있다.
Hash 기반의 클래스에서 키 값의 중복을 제거하기 위해서 실행되는 과정(키 값이 사용자 정의 클래스 객체일 때)
1. 입력된(검색 할) 객체의 hashCode 메소드 실행
2. 반환된 hashCode 메소드의 결과를 현재 저장되어 있는 모든 객체들의 hashCode 메소드의 반환값과 비교
3. 만약 동일한 hashCode 메소드의 결과가 존재한다면 equals 메소드를 실행하여 두 객체가 동일한지 비교
hashCode 메서드의 오버라이딩
Hash 기반의 클래스에 의해서 호출되는 메소드를 오버라이딩 하여 동일한 객체를 검색하기 위해 사용하게됨
동일한 hashCode를 반환하는 경우에만 eqauls 메서드 수행
특별한 경우를 제외하고는 권장하지 않는다. 이미 중복값이 발생되지 않도록 철저히 준비된 연산을 다른 연산으로 바꿔 실행하는 것은 자바의 코딩규칙을 무너뜨릴 가능성이 있다.
(=오버라이딩이 가능하지만 하지 않는 것이 좋다)
해쉬맵의 키 값 중 특정 값을 찾으려면 keys나 keySet메서드를 이용해 직접 비교하는 것을 권장함
import java.util.*;

class Rect {
	private int x;
	private int y;
	public Rect(int x, int y) { this.x = x; this.y = y;}
	public String toString() {return "x:" + this.x + ", y:" + this.y; }
	public boolean equals(Object obj) {
		if(!(obj instanceof Rect)) return false;
		Rect target = (Rect) obj;
		boolean flag = ((this.x==target.x)&&(this.y==target.y));
		return flag;
	}
	public int hashCode() {
		System.out.println("Rect 클래스의 hashCode 실행");
		return this.x + this.y;
	}


}

public class Collection09 {
	public static void main(String[] args) {
		HashMap<Rect, Integer> map = new HashMap<>();
		map.put(new Rect(10,10), 10);
		map.put(new Rect(20,20), 20);
		map.put(new Rect(30,30), 30);
		for(Rect k : map.keySet()) System.out.printf("(%s) -> %d\n", k, map.get(k));

		System.out.printf("\n(30, 30)의 유무 : %b\n", map.containsKey(new Rect(30,30)));

	}
}
예외 처리
에러 (error) : 잘못된 것, 존재하는 경우 실행될 수 없음
예외 (exception) : 특정 상황 또는 조건이 만족되는 경우 프로그램이 종료되는 현상
예외는 다양한 상황에서 발생하는 현상으로 모든 예외를 대처할 수 는 없다. 단, 예외가 발생한 경우 프로그램이 종료되지 않고 저장과 같은 기능을 사용할 수는 있어야 하므로 예외가 발생해도 프로그램이 강제 종료되지 않고 사용자에게 선택권 또는 처리 기회를 주는 것을 예외 처리라고 한다.
예 ) java.lang.ArithmeticException : 0으로 나누어 발생한 exception
4번째 실행에서 발생하여 프로그램이 종료됨

해결 방법
try~catch 구문
public class Exception01 {
	public static void main(String[] args) {

		for(int i=1; i<=10; i++) {
			int k = (int)(Math.random()*10);
			try {
				int result = 100 / k;
				System.out.println(result);
			} catch( ArithmeticException e ) {
				System.out.println("0으로 나누었습니다");
			}
		}
	}
}
try { } 중괄호 안에 있는 구문을 실행중 catch( ) 안에 있는 exception이 일어나면 중괄호 안의 구문을 실행한다.

try 실행 중 2회 ArithmeticException이 발생하여 catch 구문이 실행되었다.
특별히 지정하고 싶은 Exception이 없다면 catch(Exception e) { } 로 작성하는 것도 가능하다.
try 블럭 안에서 에러가 발생하면 해당 에러가 catch() 안에 있는 에러의 종류인지 확인 후 종류가 맞으면 catch 블럭 안의 명령을 실행 (Exception e는 모두를 포함(수용)하는 최상위 예외 클래스)
※try 구문에 있는 명령이라도 에러가 발생한 구문 다음에 위치하는 명령은 실행하지 않는다.
public class Exception02 {
	public static void main(String[] args) {
		System.out.println(1);
		System.out.println(2);

		try {
			System.out.println(3/0);
			System.out.println(4);
		} catch( Exception e ) {
			System.out.println(5);
		}
	}

}

try 안에 있는 System.out.println(3/0); 에서 에러가 발생하므로 이 부분을 5로 출력하고 그 이후 문장은 실행하지 않고 프로그램을 종료한다.
exception 별로 다른 내용을 출력하고 싶다면 catch() {}를 다수 번 사용하여 ()안에 예외 적용할 내용과 {}안에 실행할 내용을 작성한다.
public class Exception03 {
	public static void main(String[] args) {

		System.out.println(1);
		System.out.println(2);

		try {
			System.out.println(3);
			System.out.println(0/0);
			System.out.println(4);
		} catch( ArithmeticException e ) {
			e.printStackTrace(); //java.lang.ArithmeticException: / by Zero
			System.out.println("예외 메시지 : " + e.getMessage());
		} catch (Exception e) {
			System.out.println("Exception");
		}
		System.out.println(6);
	}
}
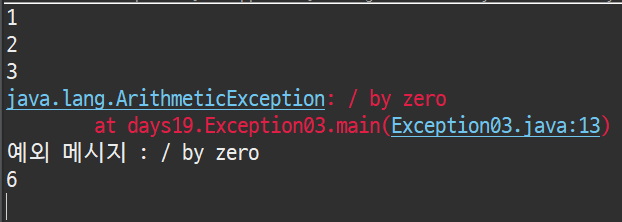
해당 에러는 ArithmeticException 이기 때문에 첫번째 catch 구문이 실행되며 exception 등장 이후의 라인(System.out.println(4);)은 실행하지 않고 try 문을 빠져나온다.
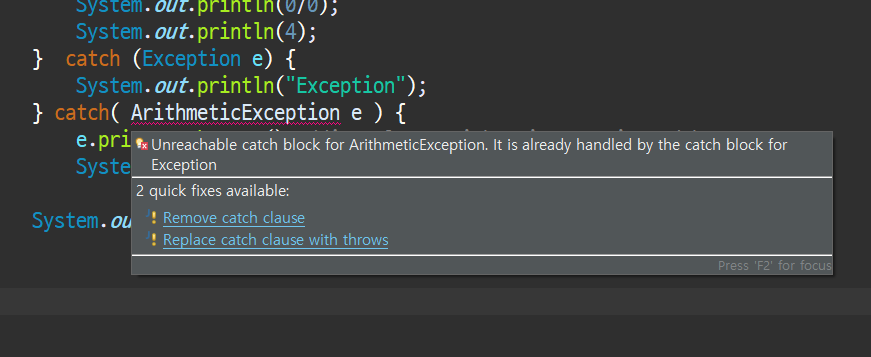
가장 먼저 나오는 catch 구문부터 순차적으로 검사하므로 범위가 큰 Exception을 ArithmeticException 보다 위에 적었을 때 아래에 있는 catch구문에 오류가 발생한다 (unreachable) 따라서 더 큰 범위의 Exception 클래스를 작은 범위의 클래스보다 아래쪽에 작성하여야 원하는 결과를 얻을 수 있다.
고의로 Exception 발생 시키기
Exception도 클래스 이기 때문에 Exception 객체를 생성하여 throw 명령을 통해 고의로 Exception을 발생 시킬 수 있다.
import java.text.ParseException;

//예외 상황 고의 발생
//종류별 예외 처리

public class Exception04 {
	public static void main(String[] args) {

		try {
			ArithmeticException a = new ArithmeticException("ArithmeticException 고의 발생");
			throw a;

		}catch (ArithmeticException e) {
			System.out.printf("ArithmeticException - ");
			System.out.println("에러메시지 : " + e.getMessage());
		}catch(RuntimeException e) {
			System.out.printf("RuntimeException - ");
			System.out.println("에러메시지 : " + e.getMessage());
		}catch(Exception e) {
			System.out.printf("Exception - ");
			System.out.println("에러메시지 : " + e.getMessage());
		}

		System.out.println();

		try {
			RuntimeException b = new RuntimeException("RuntimeException 고의 발생");
			throw b;

		}catch (ArithmeticException e) {
			System.out.printf("ArithmeticException - ");
			System.out.println("에러메시지 : " + e.getMessage());
		}catch(RuntimeException e) {
			System.out.printf("RuntimeException - ");
			System.out.println("에러메시지 : " + e.getMessage());
		}catch(Exception e) {
			System.out.printf("Exception - ");
			System.out.println("에러메시지 : " + e.getMessage());
		}

		System.out.println();

		try {
			ParseException a = new ParseException("ParseException 고의 발생", 0);
			throw a;
		}catch (ArithmeticException e) {
			System.out.printf("ArithmeticException - ");
			System.out.println("에러메시지 : " + e.getMessage());
		}catch(RuntimeException e) {
			System.out.printf("RuntimeException - ");
			System.out.println("에러메시지 : " + e.getMessage());
		}catch(Exception e) {
			System.out.printf("Exception - ");
			System.out.println("에러메시지 : " + e.getMessage());
		}
	}
}

발생 시킨 Exception의 타입의 맞게 catch 구문이 실행되었다.
-> catch 구문으로 처리할 수 없는 Exception 발생 시 err
메소드 안에서 예외가 발생 할 때 해결방법
public class Exception05 {
	public static void main(String[] args) {

		method01();

	}

	public static void method01() {
		method02();
	}
	public static void method02() {
		throw new Exception(); // 강제 예외 발생
	}

}
1. try - catch
public class Exception05 {
	public static void main(String[] args) {
		method01();
	}

	public static void method01() {
		method02();
	}
	public static void method02() {
		try {
			throw new Exception(); // 강제 예외 발생
		} catch (Exception e) { }
	}
}
2. Add Throw Declararion
"현재 메소드의 명령 중 에러(예외)가 발생할 가능성이 있다"는 꼬리표를 붙인다 (예외가 있을 수 있으니 주의하라는 표시 ) 호출하는 대상에게 Exception 처리 권한을 넘긴다. -> 호출하는 지점에서 에러(빨간줄) 표시 -> 다시 add throw declaration/ surround with try-catch 중 하나를 선택할 수 있다.
어디에선가는 Exception 처리를 해줘야 하기 때문에 계속 add throw declaration으로 Exception 처리를 떠넘길 수는 없다. 메인 클래스에서는 보통 add throw declaration을 사용하지 않는다.
public class Exception05 {
	public static void main(String[] args)  {
		try {
			method01();
		} catch (Exception e) {
			System.out.println("에러메시지 : " + e.getMessage());
		}
	}

	public static void method01() throws Exception {
		method02();
	}
	public static void method02() throws Exception {
		throw new Exception(); // 강제 예외 발생
	}

}

import java.text.SimpleDateFormat;
import java.util.*;

public class Exception06 {
	public static void main(String[] args) {

		SimpleDateFormat sdf = new SimpleDateFormat("yyyy-MM-dd");
		Scanner sc = new Scanner(System.in);

		Date inDate = null;
		System.out.println("날짜를 예와 같이 입력해주세요");
		System.out.println("(입력 예 : 2015-12-31)");
		String s = sc.nextLine();

		//String을 Date로 변경하는 메소드 parse
		inDate = sdf.parse(s); 	//exception 발생 할 수 있으므로 err
	}
}
에러 해결
->
import java.text.*;
import java.util.*;

public class Exception06 {
	public static void main(String[] args) {

		SimpleDateFormat sdf = new SimpleDateFormat("yyyy-MM-dd");
		Scanner sc = new Scanner(System.in);

		Date inDate = null;
		System.out.println("날짜를 예와 같이 입력해주세요");
		System.out.println("(입력 예 : 2015-12-31)");

		while(true) {

			try {
				String s = sc.nextLine();
				inDate = sdf.parse(s);
				break; // 윗줄에서 exception 발생시 실행 x
				// 정확히 입력한 경우에면 break; 실행
			} catch (ParseException e) {
				System.out.println("다시 입력해주세요 (입력 예 : YYYY-MM-DD)");
			}
		}

		SimpleDateFormat sdf2 = new SimpleDateFormat("yyyy년 MM월 dd일");
		System.out.println(sdf2.format(inDate));
	}
}
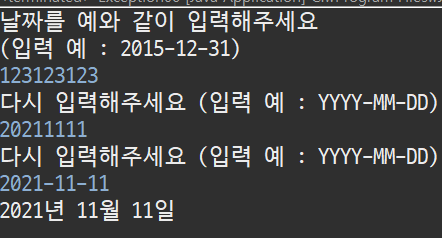
try-catch문을 while문 안에 넣어 정확한 양식으로 데이터가 입력될 때까지 반복 실행시킬 수 있다.
예제
순수하게 숫자만으로 이루어진 정수를 입력받는 while과 try-catch를 제작하시오
sc.nextInt()는 입력 내용에 문자가 섞이면 InputMismatchException에러가 발생한다. 에러가 발생하면 입력버퍼를 sc.next();를 실행해 비우고 잘못 입력했습니다. 메시지를 출력한 후 정상입력까지 반복하는 코드를 작성하라.
import java.util.*;

public class Exception07 {

	public static void main(String[] args) {

		Scanner sc = new Scanner(System.in);

		while(true) {
			try {
				System.out.print("정수를 입력하세요 : ");
				int num = sc.nextInt();
				System.out.printf("입력한 정수는 %d입니다.\n", num);
				break;
			} catch (InputMismatchException e) {
				sc.next();
				System.out.println("잘못입력하셨습니다.\n");
			}
		}
	}
}

sc.nextLine()을 사용하고 싶다면 while문을 다음과 같이 변경한다.
(nextLine()은 정수이외에 다른 타입도 입력받으므로 parseInt를 통해 Int 변수에 저장할 수 있다. 이 때 Integer 타입으로 변환할 수 없는 데이터가 Scanner을 통해 들어오면 NumberFormatException이 발생하므로 catch(NumberFormatException e) { } 로 작성한다. )
while(true) {
	try {
		System.out.print("정수를 입력하세요 : ");
		int num = Integer.parseInt(sc.nextLine());
		System.out.printf("입력한 정수는 %d입니다.\n", num);
		break;
	} catch (NumberFormatException e) {
		System.out.println("잘못입력하셨습니다.\n");
	}
}
finally
try구문에서 예외가 발생했건 안했건 반드시 실행하고 지나갈 영역
예시
새로운 파일을 생성하는 프로그램
import java.io.*;

public class Exception08 {

	static int cnt = 0;

	public static void main(String[] args) {

		File f1 = createFile("");
		File f2 = createFile("abc.txt");
		File f3 = createFile("");
	}

	private static File createFile(String fileName) {

		File f = null;
		try {
			if (fileName == null || fileName.equals(""))
				throw new IOException("파일 이름이 유효하지 않습니다.");
		} catch (IOException e) {
			fileName = "제목없음" + ++cnt + ".txt";
		} catch (Exception e) {
			System.out.printf("Exception 발생 -> ");
			e.printStackTrace();
		} finally {
			f = new File(fileName);
			try {
				f.createNewFile();
			} catch (IOException e) {
				System.out.println(fileName + "생성에 실패하였습니다.");
			}
		}
		return null;
	}

}
f1과 f3는 제목이 없기 때문에 createNewFile 생성시 IOException이 발생한다.
try 구문으로 들어가면 fileName이 null이거나 입력되지 않으면("") IOException이 발생하고 이 IOException는 첫번째 catch구문으로 가 fileName이 제목없음+cnt+txt 로 변경된다.
이후 finally 구문으로 가서 파일이 생성된다.

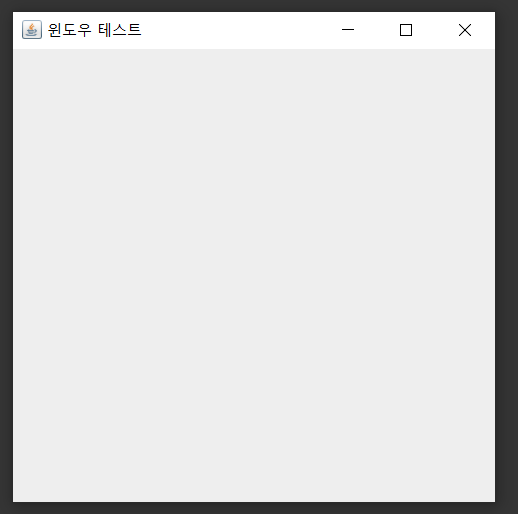
Swing - JFrame
맛보기
import javax.swing.JFrame;

class WindowTest extends JFrame {
	WindowTest() { //생성자
		setTitle("윈도우 테스트");
		setSize(500, 500); // 창 크기
		setDefaultCloseOperation(JFrame.EXIT_ON_CLOSE);
		//끄는(시스템을 종료하는) 버튼 만들기
		setVisible(true); //생성된 윈도우의 화면 표시
	}
}
public class SwingEx {
	public static void main(String[] args) {

		WindowTest win = new WindowTest();	//창 표시

	}
}